|
<< Click to Display Table of Contents >> Importing a gINT Project |
  
|
|
<< Click to Display Table of Contents >> Importing a gINT Project |
|
Boring and well data can be imported and exported to and from gINT version 8 project databases. These project database have the extension "gpj" and are the same as a Microsoft Access database file.
A gINT project can be imported by selecting File > Import > gINT Project. A file dialog will be displayed to specify the gINT project file to import. After the file has been selected, the import form below will be displayed. This form has two tabs, one for project information and one for table information,
Project Information Tab
When the gINT project database is selected, the project number, name, client, and location will be read from the database. In addition the project boundaries will be determined from the point locations.
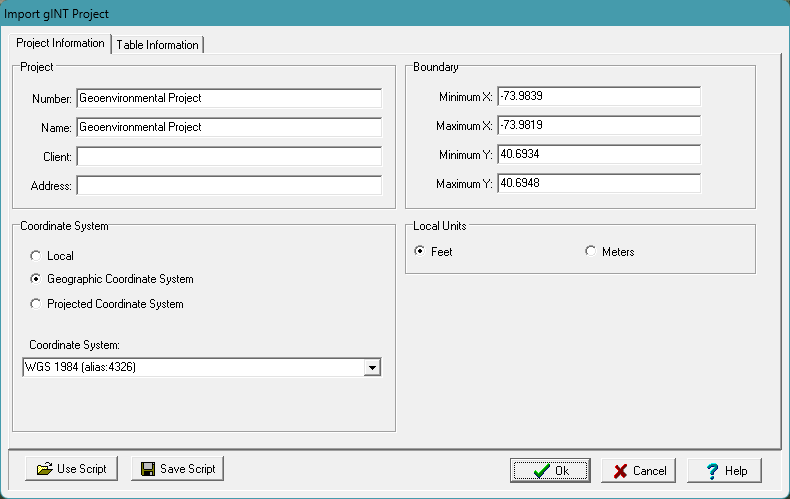
The following can be edited on this tab:
Project Number: This is the unique project number for the gINT project after it has been imported.
Project Name: This is the project name for the imported project.
Client: This is the client for the project.
Address: This is the address of the project.
Coordinate System: This is the type of coordinate system for the project. If the type of coordinate system is geographic or projected, the coordinate system can be selected.
Boundary This is used to specify the project's minimum and maximum X (longitude) and Y (latitude). If the coordinate system is Local, they are specified in the units selected for local units. If the coordinate system is geographic, they are specified in decimal degrees. And if the coordinate system is projected, they are specified in meters.
Local Units: This is used to select the local units of the project.
Table Information Tab
This tab is used to select the tables and columns to import. On the left side of this tab is a list of tables in the gINT project database. When a table is selected, the right side of the form will display the columns in the table. The entire table can be excluded from the import by unchecking the Import box.
When a table is selected to import, the form will display the columns (fields) in the table that can be imported. The type of dataset within GaeaSynergy can be selected for each column as well as the way that data will be displayed. In addition, individual columns (fields) can be included or excluded by clicking on the Include box.
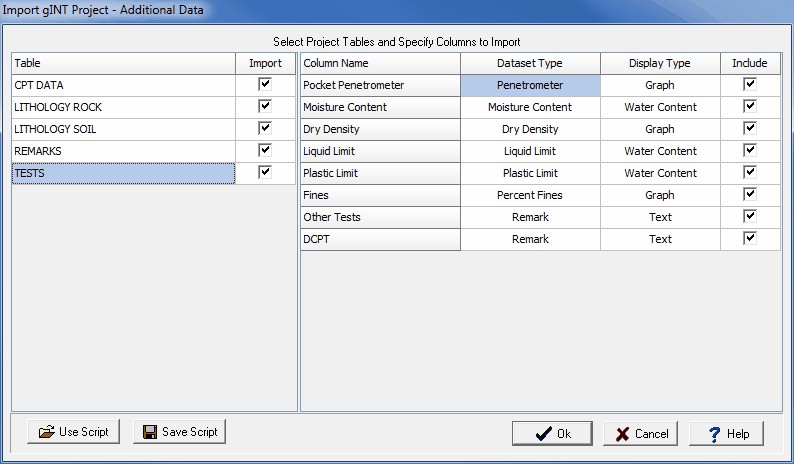
(The appearance of the form will differ slightly depending on if it is WinLoG or WinLoG RT)
Scripts
To make this process easier if you are importing gINT project files a lot, you can create and use scripts for the import settings. To create a new script with the current display type settings click on the Save Script button and enter a name for the script. The script file should only be saved after all of the export settings have been entered. To open and use an existing script, click on the Use Script button and select the script.
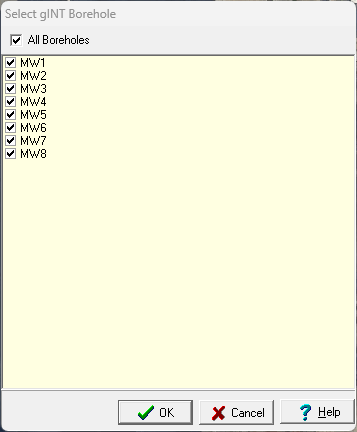
Borehole and Well Selection
When the dataset and display types have been specified, click the Ok button to proceed. Next, the borings/wells to be imported must be selected on the Import form below.
Template Selection
After the borings and wells have been selected, a template must be selected or setup for the imported data. These steps are covered in the topics below.