

Introduction
Borehole logs are the backbone of geotechnical, environmental, and hydrogeological investigations. They transform raw field observations into structured, interpretable datasets that support engineering design, groundwater analysis, and regulatory reporting.
However, the process of converting field notes into professional borehole logs can be time-consuming and error-prone—especially when relying on manual transcription or inconsistent data entry practices.
This is where WinLoG and WinLoG Field Assistant provide a powerful, integrated solution.
Together, these tools enable a seamless workflow from field data collection to final borehole log generation—ensuring accuracy, consistency, and efficiency at every stage.
In this guide, we walk through the complete process of creating a borehole log from field data, from on-site capture to finalized output.
🧭 Understanding the Workflow
Before diving into the steps, it’s important to understand the full workflow:
- Field Data Collection (WinLoG Field Assistant)
- Data Transfer & Synchronization
- Borehole Setup in WinLoG
- Lithology & Sample Data Entry
- Geophysical and Test Data Integration
- Log Formatting & Template Application
- Final Output & Reporting
Each step plays a critical role in ensuring the integrity and usability of your borehole data.
📱 Step 1: Collecting Field Data with WinLoG Field Assistant
The first step in creating a borehole log begins in the field.
What is WinLoG Field Assistant?
WinLoG Field Assistant is a mobile-friendly tool designed for capturing borehole data directly during drilling operations. Instead of relying on handwritten notes, field personnel can input structured data in real time.
Key Data Collected in the Field
During drilling and sampling, the following information is typically recorded:
🔹 General Borehole Information
- Borehole ID
- Location coordinates
- Elevation
- Drilling method
- Start and end dates
🔹 Lithology Descriptions
- Soil/rock type
- Color
- Grain size
- Moisture condition
- Consistency
🔹 Sampling Data
- Sample depth intervals
- Sample type (SPT, Shelby tube, grab sample)
- Recovery percentage
🔹 Field Tests
- Standard Penetration Test (SPT) values
- Pocket penetrometer readings
- Vane shear tests
Why Digital Field Logging Matters
Using WinLoG Field Assistant:
- Eliminates transcription errors
- Standardizes data collection
- Speeds up office processing
- Ensures consistent formatting
🔄 Step 2: Transferring Field Data to WinLoG
Once field data is collected, it must be transferred into WinLoG for processing and visualization.
Data Transfer Methods
- Direct file export/import
- Cloud synchronization
- Manual import of structured datasets
Best Practices
- Verify all borehole IDs match project naming conventions
- Check depth intervals for consistency
- Confirm units (meters vs feet)
Common Pitfalls
❌ Missing intervals
❌ Duplicate borehole IDs
❌ Inconsistent lithology descriptions
👉 Catching these early prevents downstream issues in visualization and reporting.
🏗️ Step 3: Creating a Borehole in WinLoG
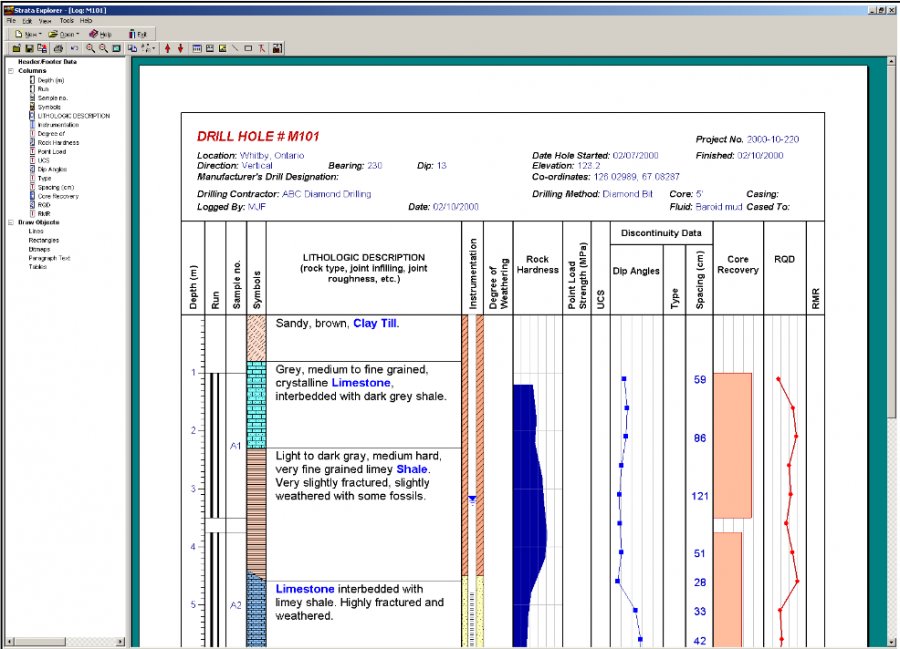
After importing your data, the next step is to create a borehole within WinLoG.
Setting Up a New Borehole
In WinLoG:
- Create a new project or open an existing one
- Add a new borehole
- Enter header information:
- Borehole ID
- Location
- Elevation
Applying a Template
Templates define how your borehole log will appear.
Typical template components include:
- Lithology column
- Sample data column
- Graphical data columns
- Text annotations
Why Templates Matter
Templates ensure:
- Consistent presentation across projects
- Faster log generation
- Standardized reporting
🧱 Step 4: Entering Lithology and Sample Data
This is where your field data becomes structured digital information.
Lithology Entry
Each layer should include:
- Depth interval (e.g., 0–1.5 m)
- Material description
- Color
- Texture
Sample Data Entry
Add sampling details such as:
- Sample type
- Depth
- Test results
Pro Tip: Use Standardized Descriptors
Instead of free text, use:
- Controlled vocabularies
- Predefined descriptors
👉 This improves:
- Data consistency
- Searchability
- Reporting quality
📊 Step 5: Adding Geophysical and Test Data
Modern borehole logs often include additional datasets.
Common Data Types
- SPT N-values
- Cone penetration data
- Gamma ray logs
- Resistivity data
Enhancing Logs with Calculated Data
You can create derived values such as:
- Average N-values
- Combined geophysical curves
- Interpreted parameters
📤 Step 6: Generating Final Outputs
WinLoG allows you to export borehole logs in multiple formats.
Output Options
- PDF reports
- Printed logs
- Digital files for integration
Use Cases
- Engineering reports
- Environmental assessments
- Regulatory submissions
⚠️ Common Mistakes to Avoid
❌ Inconsistent Data Entry
Leads to unreliable logs
❌ Poor Template Design
Results in cluttered outputs
❌ Missing Field Data
Creates gaps in interpretation
❌ Lack of Standardization
Reduces data usability
🚀 Best Practices for Efficient Borehole Logging
✔ Standardize Everything
- Lithology terms
- Units
- Naming conventions
✔ Use Templates
- Save time
- Ensure consistency
✔ Validate Early
- Check data during import
- Avoid rework later
✔ Integrate Workflows
- Field → Office → Reporting
🔗 Integrating into Larger Workflows
Borehole logs are not standalone—they feed into:
- Subsurface modeling
- Cross-section generation
- Contaminant transport analysis
- Environmental reporting
🌍 Industry Applications
Geotechnical Engineering
- Foundation design
- Soil analysis
Environmental Consulting
- Site assessments
- Contamination studies
Hydrogeology
- Groundwater monitoring
- Aquifer analysis
🏁 Conclusion
Creating a borehole log from field data is more than just data entry—it’s a structured workflow that transforms raw observations into valuable insights.
By combining WinLoG Field Assistant and WinLoG, you can:
- Capture accurate field data
- Eliminate transcription errors
- Standardize workflows
- Produce professional, high-quality borehole logs
As projects become more data-driven, adopting a digital, integrated approach to borehole logging is no longer optional—it’s essential.
Related Articles
- Using Templates for Faster Borehole Logging: Standardizing Geotechnical Workflows in WinLoG
- Editing and Structuring Lithology Data: Best Practices for Accurate Borehole Logs and Geoscience Workflows
- WinLoG Advanced Features You’re Not Using (But Should)
- How Do I Use Calculated Graph Columns in WinLoG?
- How Do I Create and Manage Lithologic Libraries in WinLoG?
- How Do I Create and Enter Tables in WinLoG Templates and Logs?
- How Do I Upgrade a Single User version to WinLoG Version 6?
- Moving to WinLoG v6: Seamless Data Migration for Your Borehole History
- How to use Lithology Descriptors to Standardize Logs
- How to use Sample Descriptors to Standardize Logs
- How to add Geophysical Data to a Well Log in WinLoG
- How to Quickly Enter Standardized Lithologic Layers in WinLoG
- How to Create a Well Diagram in WinLoG
- How to Import Boring and Well Data from Excel in WinLoG
- How to Import Multiple Boring and Well Locations from Excel to WinLoG
- Why is my WinLoG header data not displaying on the log?
- Why do some of the WinLoG headers in my template not appear when entering boring data?