

Managing a GaeaSynergy network installation allows organizations to centrally manage licenses, users, and concurrent access across multiple workstations. With the GaeaSynergy License Manager and Network License Monitor, administrators can register licenses, add users, monitor activity, and control access to licensed modules such as WinLoG, WinFence, EDMS, and GDMS.
This guide explains how to:
- Install and configure the network license server
- Register a network license
- Add and manage users
- Configure client computers
- Allow users to log into the network license system
The information in this article is based on the official GaeaSynergy License Manager User Guide.
Understanding the GaeaSynergy Network Licensing System
GaeaSynergy supports both standalone and network licensing. In a network environment, licenses are managed using concurrent licensing, meaning multiple users can share a pool of licenses as long as the maximum licensed user count is not exceeded.
The network licensing system consists of two components:
- GaeaSynergy License Manager Service
- Runs on the server
- Handles license requests and user authentication
- Operates in the background with no user interface
- GaeaSynergy License Monitor
- Administrative interface
- Used to register licenses, manage users, and monitor activity
Step 1 – Install the Network License Server
Before installing GaeaSynergy on client computers, the License Manager service should first be installed on the server.
Install the License Manager
Download and run the network license setup from GAEA Technologies:
GaeaSynergy6_Network_License_Setup.exe
During installation:
- The License Manager application is installed
- The License Manager service is installed
- Start menu shortcuts are created
Configure Shared Folders
The server folders containing the databases and datastore must:
- Be shared on the network
- Have Full Control permissions for all users
This is critical to ensure all client computers can access the shared project databases and datastore.
Start the License Service
The service can be started:
- Automatically when the server boots
- Or manually through the Windows Services Manager
To start manually:
- Open Windows Control Panel
- Open Administrative Tools
- Open Services
- Locate:
- GaeaSynergy 6 License Manager
- Click Start
Step 2 – Install GaeaSynergy on Client Computers
Installing GaeaSynergy on a client workstation is similar to a standalone installation.
During setup:
- Select the Network option
- Do NOT overwrite the shared databases and datastore already located on the server
It is recommended to keep the default local folders during installation and then configuring the shared network folders afterward.
Step 3 – Configure Database and Datastore Folders

After installation, each client computer must point to the server databases and datastore.
To configure this:
- Launch GaeaSynergy
- Log in as an Administrator using:
- Username: Admin
- Password: admin
- Select:
- File > Preferences
- Open the Datasources tab
- Set:
- Database folder path
- Datastore folder path
- Point both locations to the shared server folders
This ensures all users access the same centralized project data.
Step 4 – Configure Network License Settings
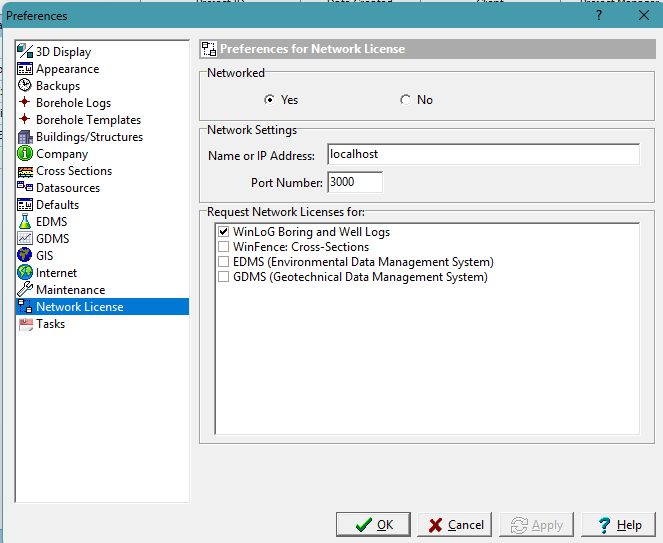
Each client workstation must also be configured to obtain licenses from the network server.
To configure network licensing:
- Open:
- File > Preferences
- Select:
- Network License
- Set:
- Networked = Yes
- Enter:
- Server name or IP address
- Set the port number to:
- 3000
- Select the modules to request from the network
The server information is displayed within the Network License Monitor application on the server.
Step 5 – Register the Network License
After the server is installed, licenses must be registered before client modules will operate fully.
Unlicensed modules will run in demo mode until registration is completed.
Open the License Manager
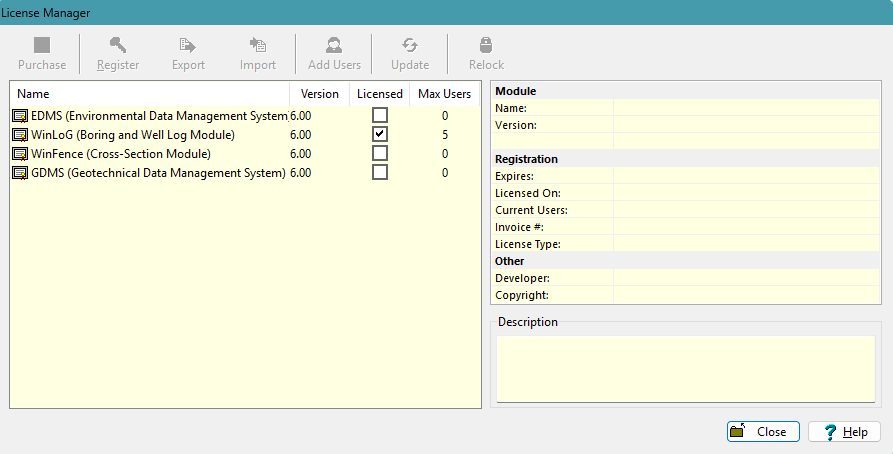
On the server:
- Launch GaeaSynergy License Monitor
- Click:
- Manage Licenses
The License Manager displays:
- Installed modules
- Licensed modules
- Maximum users
- License details
Manual License Registration
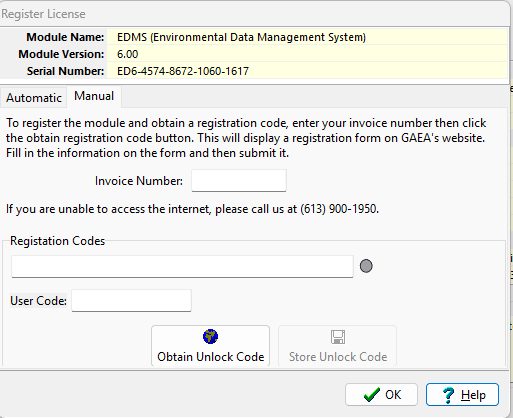
- Select the module and then click on Register
- Open the Manual registration tab
- Provide GAEA with:
- Invoice number
- Serial number
- Request an unlock code from:
sales@gaeatech.com
After receiving the registration code:
- Enter the unlock code and user code.
- Click:
- Store Unlock Code
Step 6 – Add Network Users
Before users can log into GaeaSynergy on the network, user accounts must be created within the Network License Monitor.
Open Manage Users
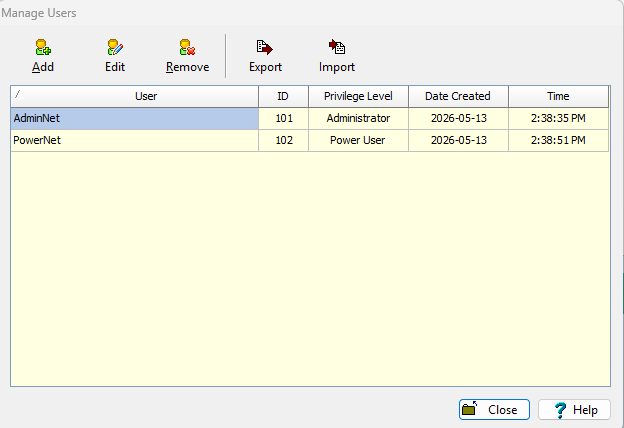
- Launch:
- GaeaSynergy License Monitor
- Click:
- Manage Users
The Manage Users window allows administrators to:
- Add users
- Edit users
- Remove users
- Import/export users
Adding a User
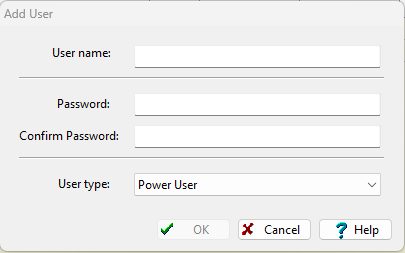
To create a new user:
- Click:
- Add
- Enter:
- Username
- Password
- User Type (Privilege Level)
- Click:
- OK
Each username should be unique.
User Privilege Levels
GaeaSynergy supports several user privilege levels:
- Administrator
- Power User
- Limited User
- Guest
These privilege levels control access to features such as:
- Managing licenses
- Editing projects
- Import/export functionality
- GIS tools
- EDMS administration
- WinLoG templates and macros
For example:
| Function | Admin | Power | Limited | Guest |
|---|---|---|---|---|
| Manage Users | Yes | No | No | No |
| Manage Licenses | Yes | No | No | No |
| Edit Borings/Wells | Yes | Yes | Yes | No |
| Print Logs | Yes | Yes | Yes | Yes |
Editing or Removing Users
Edit a User
- Select the user
- Click:
- Edit
- Modify:
- Username
- Password
- User Type
Remove a User
- Select the user
- Click:
- Remove
Step 7 – User Login Process
After network licensing and users are configured, users can log into GaeaSynergy from their client computers. Using the user name and password assigned to them in the step above.
User Login Workflow
When users launch GaeaSynergy:
- The client connects to the network license server
- The server validates:
- Username
- Password
- License availability
- A license lock is assigned if available
- The requested modules become active
The system uses concurrent licensing, so the number of active users cannot exceed the licensed user count.
Monitoring Active Users and Licenses
Administrators can monitor license usage in real time using the License Monitor dashboard.
Active Locks
The Active Locks window shows:
- Module currently in use
- Username
- User location
- Login date and time
Usage History
The History view displays:
- License usage trends
- Denied license requests
- Peak usage periods
This helps organizations determine if additional concurrent licenses are required.
Event Logs
The Show Log window records:
- Logins
- License requests
- Errors
- Connection events
- Security events
Final Thoughts
The GaeaSynergy Network License Manager provides a centralized and scalable solution for managing concurrent licenses and user access across your organization. By properly configuring the server, registering licenses, setting up users, and configuring client workstations, administrators can ensure smooth access to GaeaSynergy modules while maintaining security and control.
The built-in monitoring tools also provide valuable insight into license utilization, helping organizations optimize software deployment and manage future licensing requirements.
For additional assistance with network licensing, registration, or migration, contact GAEA Technologies support.