

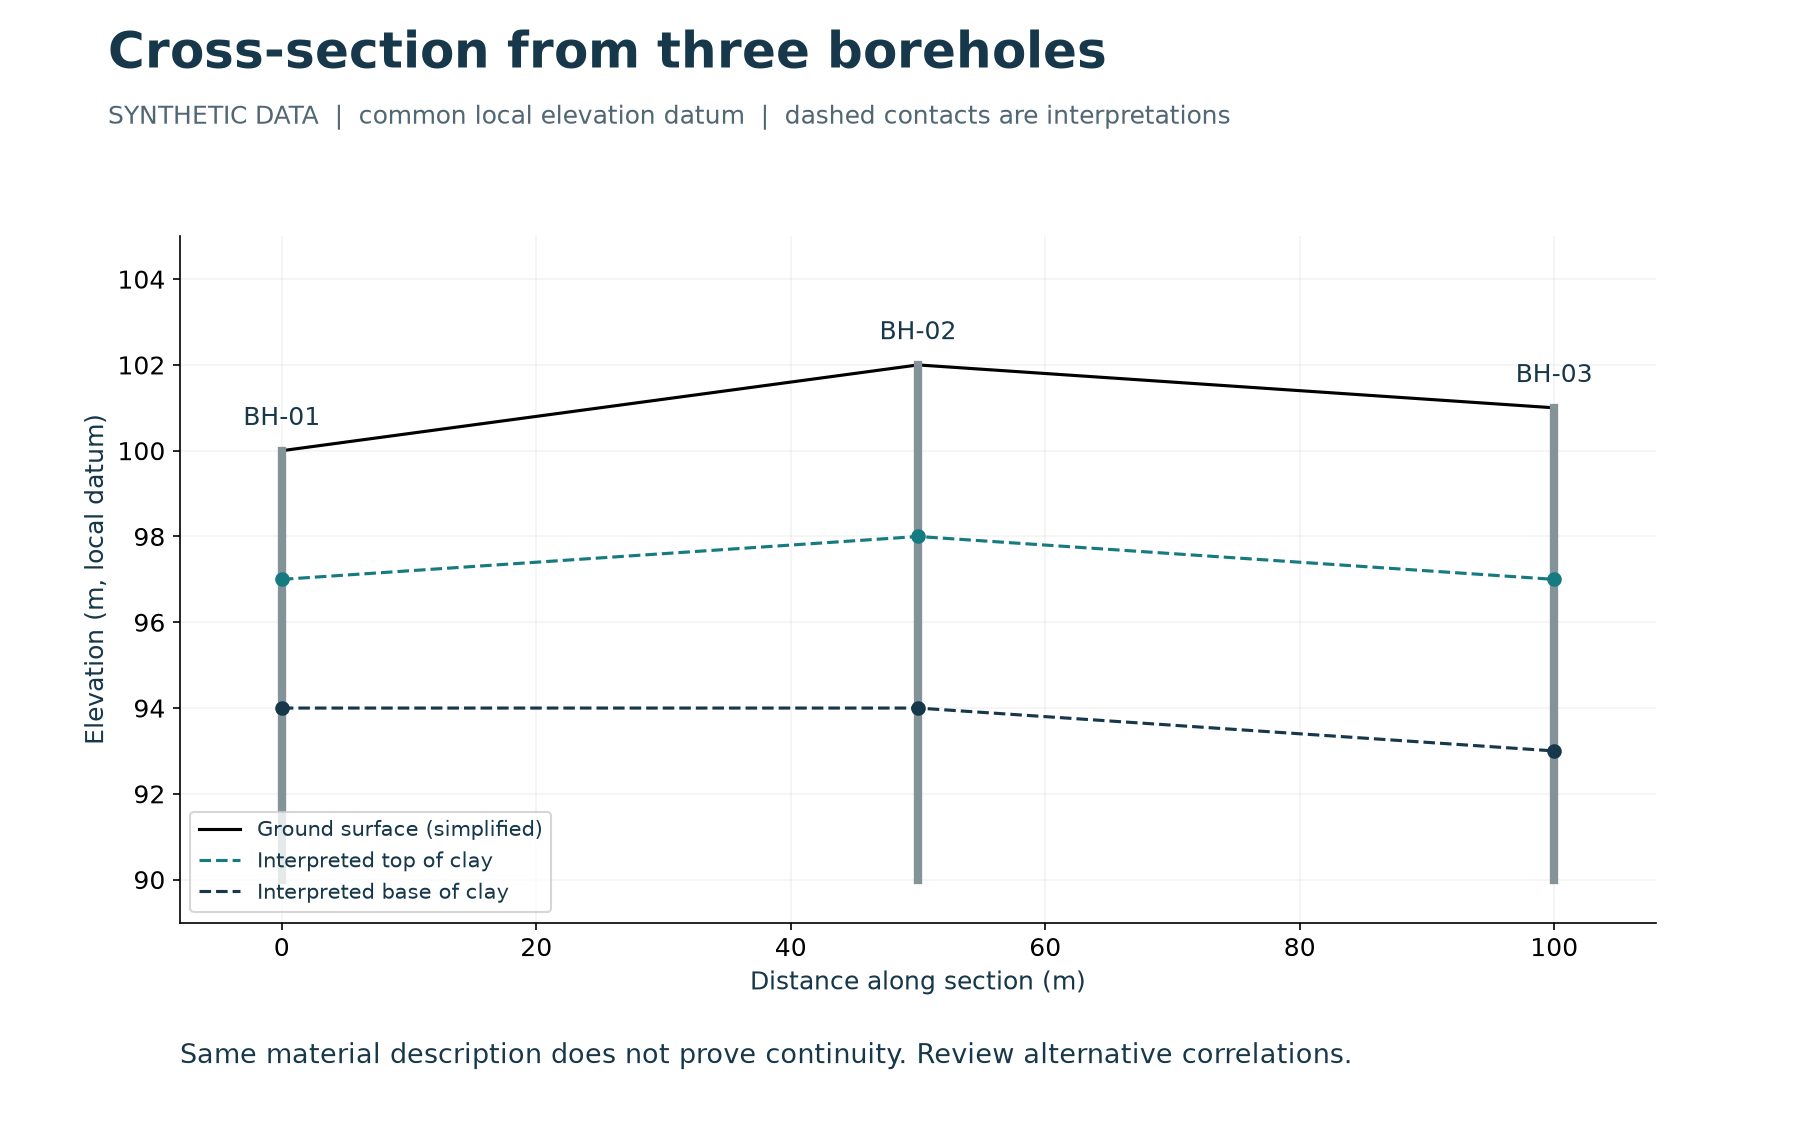
Drawing a geological cross-section from borehole data involves two different activities: plotting the observations in the correct spatial framework and interpreting what may occur between them. The first depends on reliable coordinates, elevations and depth references. The second requires geological reasoning and an honest presentation of uncertainty. Software can assist both the layout and editing, but it cannot turn unobserved ground into measured evidence.
This guide uses three synthetic vertical boreholes on a straight alignment. It walks through the arithmetic and the interpretation choices, then explains how to review the result in a software workflow. The example is educational and does not represent a real investigation or an engineering design model.
Download the worked example
The cross-section worked-example PDF contains the figure and the key values. The learning examples pack includes cross-section-example.csv. The generic CSV is a teaching table, not a guaranteed native import file for every application. Validate field mappings before using external data in a production project.
Define the question and alignment
Decide what the section needs to explain: the distribution of a unit, a possible buried channel, conditions along an infrastructure alignment or a relationship relevant to a conceptual site model. Then choose an alignment that addresses that question. Record its direction, endpoints and relationship to the project coordinates. An arbitrary line selected only because it includes convenient holes may omit the feature that matters.
The example places BH-01, BH-02 and BH-03 directly on a straight line at distances of 0, 50 and 100 m. Real investigations often include holes offset from the alignment. Establish and disclose the projection method and offset distances. Projecting a distant hole onto a section can imply more spatial certainty than the evidence supports.
Prepare the borehole records
Verify identifiers, locations, coordinate reference system, ground elevations, datum, total depths and units. Review lithology intervals for gaps, overlaps or inconsistent terms that need explanation. Preserve original descriptions while establishing any interpretation codes used for correlation. A shared word in two descriptions is not sufficient evidence that the material belongs to one continuous geological unit.
Check whether the holes are vertical. The simple depth-to-elevation calculation used below assumes vertical depth below ground level. Deviated drilling requires the appropriate survey and geometry. Review supporting sample, laboratory and geophysical information where relevant to the interpretation, and retain the link back to those records.
Convert contact depths to elevations
BH-01 begins at elevation 100.0 m and encounters the top of the example clay at 3.0 m depth. Its contact elevation is 97.0 m. BH-02 begins at 102.0 m with the contact at 4.0 m depth, giving 98.0 m. BH-03 begins at 101.0 m with the contact at 4.0 m depth, giving 97.0 m. All values use the same fictional local datum.
The equation is contact elevation = ground elevation – vertical depth below ground. Plotting contact depths directly against a single common ground line would produce the wrong geometry for this example. Preserve the original depth and the calculated elevation so another reviewer can check the transformation.
Plot the observations first
Choose horizontal distance and elevation axes, label their units and plot each borehole at its correct distance. Add ground elevation, investigated depth and observed contacts. Keep the borehole record visually distinct from the interpreted lines between holes. A reader should be able to identify where there is direct investigation evidence and where an interpretation begins.
The teaching figure uses points at the top and base of the example clay and dashed connecting lines. It does not imply that all material between the points was observed. The simplified ground surface is another assumption; on a real site, use appropriate topographic information instead of automatically drawing straight segments between collars.
Interpret correlations with supporting evidence
Ask whether the proposed connection is consistent with descriptions, test results, regional geology and plausible depositional or structural relationships. Consider alternatives such as separate lenses, a pinch-out, erosion or an unrecognized change between widely spaced holes. A continuous line is one possible interpretation, not the default truth simply because the drawing tool can connect the points.
Document why you selected a correlation and what evidence would change it. Where confidence is limited, use a suitable line style, note or alternative section. Avoid inventing a precise boundary location between holes when the investigation only supports a broad possibility. GAEA’s pinch-out guide discusses an important example of this problem.
State the scale and vertical exaggeration
A cross-section may use different horizontal and vertical scales to make thin units visible. State that choice clearly. Vertical exaggeration can make a gentle contact appear steep, so apparent angles on the page should not be treated as actual dips without considering the scales. Resizing a figure unevenly can also alter its visual geometry.
The supplied figure has approximately 3.4 times vertical exaggeration based on its plotted axis dimensions and ranges. It is intended to make the small elevation differences readable. For a deliverable, verify the final export size and scale bars rather than relying only on the editing view. Keep the labels and legend legible at the size the reader will actually use.
Use WinFence as a reviewable drawing workflow
GAEA’s WinFence supports cross-section and fence-diagram workflows using applicable project data. Its feature guide describes defining an alignment, selecting supporting tracks, generating or drawing strata, and editing boundaries. Treat an initial automatic correlation as a starting point for review.
Test the example or a representative project in the intended software configuration. Check how coordinates, elevations and lithology are mapped, then compare the displayed contacts with a hand-checked table. Confirm which data and modules are required for your workflow. A successful display does not establish that every import field or correlation has been interpreted correctly.
Review the section before delivery
Compare every plotted contact with the source borehole. Check hole order, offsets, datum, units, investigated depths, line styles and legend. Confirm that the section does not extend an observed unit below the available evidence without identifying the interpretation. Review groundwater information separately, preserving observation dates and references rather than automatically connecting unrelated readings.
Then assess the geological explanation as a whole. Look for impossible crossings, unintended disconnected units and correlations that conflict with supporting evidence. Have the appropriate professional review the section for its intended purpose. Keep unresolved questions visible in the project record instead of removing them to simplify the drawing.
Preserve the data and the interpretation
Retain source records, accepted data, alignment definition, interpretation notes and issued output. A later borehole may change a correlation even when the earlier observations remain valid. Preserve enough history to explain that revision. This is especially important when a section is reused in another report or a later phase of the project.
The practical aim is a section that readers can understand and reviewers can reconstruct. Accurate plotting, explicit assumptions and documented geological judgement contribute more to that outcome than a highly polished image alone. Use a representative example when evaluating WinFence so the full path from borehole record to reviewed section is demonstrated.